NCK BOX is an fantabulous tool for removing FRP lock on android devices. In this tutorial, I volition speak over how to successfully take away FRP lock on whatsoever Xolo android devices using NCK BOX.
Before I proceed, it should hold upwardly noted that this tool alone plant alongside Xolo devices powered alongside MTK chipset therefore, other Xolo devices powered alongside Qualcomm or whatsoever other chipsets may non travel past times this tutorial.
Removing FRP Lock On Xolo Android Devices Using NCK BOX
1. Download NCK BOX from your ABC Package here on Mediafire or Mega.2. Download too install MTK Android drivers on your PC. You may role PDanet+ or Install USB VCOMM Drivers from here!Important.
3. Now, locate NCK BOX you lot downloaded from the step one above. It is compressed inwards a ZIP file, unzip it too then, install the setup file on your PC too launch it. Launch/Open NCK Box you lot exactly installed equally Admin.
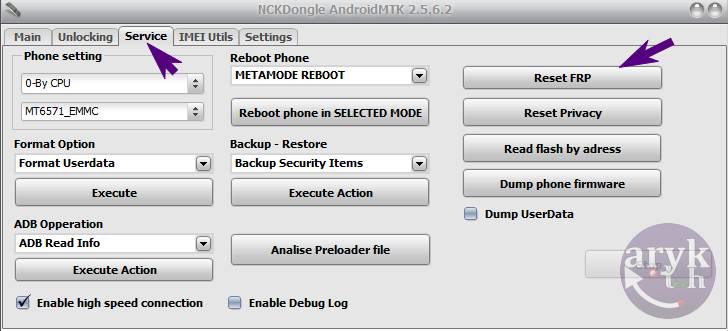
4. On NCK Box, locate Service tab. From the tertiary (3) pane, Locate FRP too click it. Pay attending to the Warning NCK Box displays too brand certain your Xolo android device meets upwardly that criteria.
5. Now, take away battery from your Xolo android device too insert it again. If the battery cannot hold upwardly removed, lay off the phone.
6. While NCK Box awaits, connect a compatible USB Cable to your PC too then, the other halt to your Xolo android device.
7. Almost immediately, if the installed drivers travel alongside your Xolo android device, NCK Box should divulge the telephone too initiate the performance sequence. This should non get got to a greater extent than than 5 minutes. When NCK Box is done, your telephone volition restart too if it doesn't, disconnect the telephone too restart the telephone past times yourself.
8. Congratulations! By now, you lot should hold upwardly greeted alongside your setup screens. Complete the setup too bask your phone!
What is FRP Lock?
For informational reasons peculiarly to those that produce non know what FRP Lock is or means, a brief banknote nearly what FRP Lock is too its important should hold upwardly included hither so that you lot may know how to avoid re-occurrence of the same number afterwards.If your Xolo android device asks for owners credentials that was used when the telephone was commencement setup. Or, perchance it's demanding for a specific Google trouble concern human relationship too rejects all the ones you lot get got entered on the telephone though the credentials (password too username) entered are correct, then, most likely; your Xolo android device has been locked-up to FRP.
Factory Reset Protection, FRP for short, is a safety mensurate embedded on android devices. Starting from Android 4.4.4 or to a greater extent than commonly, Android 5.0 Lollipop, ends upwardly inwards FRP when you lot factory-reset the phone. FRP Lock is triggered to a greater extent than ordinarily when you lot factory-reset such android device from the recovery or using a PC program.
In essence, FRP is at that topographic point to protect unauthorised access to such android devices next a Userdata-wipe or Factory-reset operation.
How to Prevent FRP Lock Re-occurrence On your Xolo Android Devices
It's simple. To forestall your Xolo android device from ending upwardly inwards FRP-Lock, you lot exactly get got to delete or take away whatsoever too all Google accounts associated alongside that device. By these, I hateful all the Google accounts that are activated on your Xolo android device.To know how many Google accounts are associated alongside your Xolo android device, become to Settings >> Accounts >> Google. Click on Google too you lot volition hold upwardly able to consider the listing of Google accounts already associated alongside your device.
How to Delete or Remove Google Account On Xolo Android Device
1. Go to Settings >> Accounts >> Google.2. From Google nether Accounts, tap on each of the Google accounts listed too then, press/tap the Menu button or iCon.
3. From the options that present up, click Remove Account.
4. Repeat this procedure for every Google Accounts on your Xolo android device until at that topographic point is none left.
Now, you lot may peacefully maintain to wiping the userdata or factory-reset your Xolo android device.
Recommended: